Getting results from essential oils isn’t just about choosing the right oils for your needs. It’s also about knowing how to dilute essential oils correctly.
Dilution is everything when you’re using essential oils on your skin or on sensitive populations, such as kids or pregnant women.
So, in this essential oil dilution guide we’re going to look at everything you need to know about diluting these powerful oils.
By the end of this post you will learn about:
- the best ways to dilute essential oils.
- how to dilute essential oils for the skin and face,
- essential oil dilution for kids (including babies).
By the way, if you’re pregnant, there’s a separate post on essential oils and pregnancy, just for you.
BENEFITS OF ESSENTIAL OIL DILUTION AND WHY IT MATTERS
Before we dive in, it’s important to know that there are some essential oils that many people can use “neat” (i.e. undiluted) on the skin.
Lavender is probably the most famous one.
For most people, neat application of lavender is unlikely to produce adverse reactions.
However, even though you may not have visible side effects from undiluted essential oils, there are 4 reasons why you should always dilute essential oils for topical use:
- prevents dryness
- slows down evaporation
- prevents adverse skin reactions
- prevents toxicity
Prevents Dryness
All essential oils are drying.
This means that applying undiluted oils on your skin will eventually lead you down the path to dry (irritated) skin.
So, if these oils are so drying, then why do they appear in tons of beauty and skincare products?
Well, it’s because beauty products contain other ingredients that help to properly disperse and dilute the essential oils.
As a result, this counteracts the drying effects of the essential oils so that you can enjoy their healing benefits.
Slows Down Evaporation
Undiluted essential oils evaporate quickly once they’re exposed to air.
So, using them undiluted on the skin, means you’re wasting your oils and not getting a whole lot of benefits.
On the other hand, dilution slows down the evaporation process.
This allows your body to actually absorb more of the oils.
Plus, when you dilute your oils, you waste less of it.
And that means you spend less money restocking your oils 🙂
To see how dilution affects evaporation and the skin, check out this short video from essential oil expert and chemist, Dr. Robert Pappas.
Very helpful!
Prevents Adverse Skin Reactions
Adverse skin reactions to essential oils usually include symptoms like (source):
- Burning sensation
- Redness
- Itching
- Blisters
Although it’s possible for these symptoms to occur even with dilution (if your skin is particularly sensitive), these symptoms are most often associated with undiluted oils.
Prevents Systemic Toxicity
Using undiluted oils, especially in high amounts, on a regular basis, can be toxic to the liver, the nervous system and a developing fetus (source).
So, once again it’s important to dilute your oils properly so that you get all the benefits and none of the (potentially hazardous) side effects.
CARRIER OILS FOR ESSENTIAL OIL DILUTION: WHICH OILS TO MIX WITH ESSENTIAL OILS
In order to dilute essential oils for the skin, you need a carrier.
A carrier is simply a solution that “carries” the essential oil to the skin safely.
Generally speaking, liquid oils (aka carrier oils), are the best way to dilute essential oils.
Here are a few carrier oils to choose from:
- Almond oil
- Apricot kernel oil
- Argan oil
- Avocado oil
- Coconut oil
- Evening primrose oil
- Grapeseed oil
- Hemp seed oil
- Jojoba oil
- Macadamia nut oil
- Olive oil
- Pomegranate seed oil
- Rosehip oil
- Sesame Oil
By the way, please know that you’re not limited to the oils listed above.
You can definitely use other plant oils.
The above list simply gives you the oils that are common and easy to find.
Other Essential Oil Carriers
In addition to oils, you can also dilute essential oils in butters like:
- Shea butter
- Mango butter
- Kokum butter
- Cocoa butter
However, keep in mind that butters are quite heavy.
So, you may end up absorbing less essential oils when you use mostly heavy butters.
Lastly, you can also dilute essential oils in:
- lotions
- creams
- castile soap
- shampoos
- aloe vera jelly
ESSENTIAL OIL DILUTION RATIO CHART
Now it’s time to talk about the most critical aspect of essential oil dilution: the dilution rate.
The dilution rate tells you the concentration of essential oils in your blend.
So, let’s say you mix lavender oil and coconut oil in a 1% dilution.
That means 1% of the blend contains lavender oil.
For topical application, a dilution of 0.5 to 5% works for most people.
As you’ve probably guessed already, the higher the dilution rate, the higher the essential oil concentration.
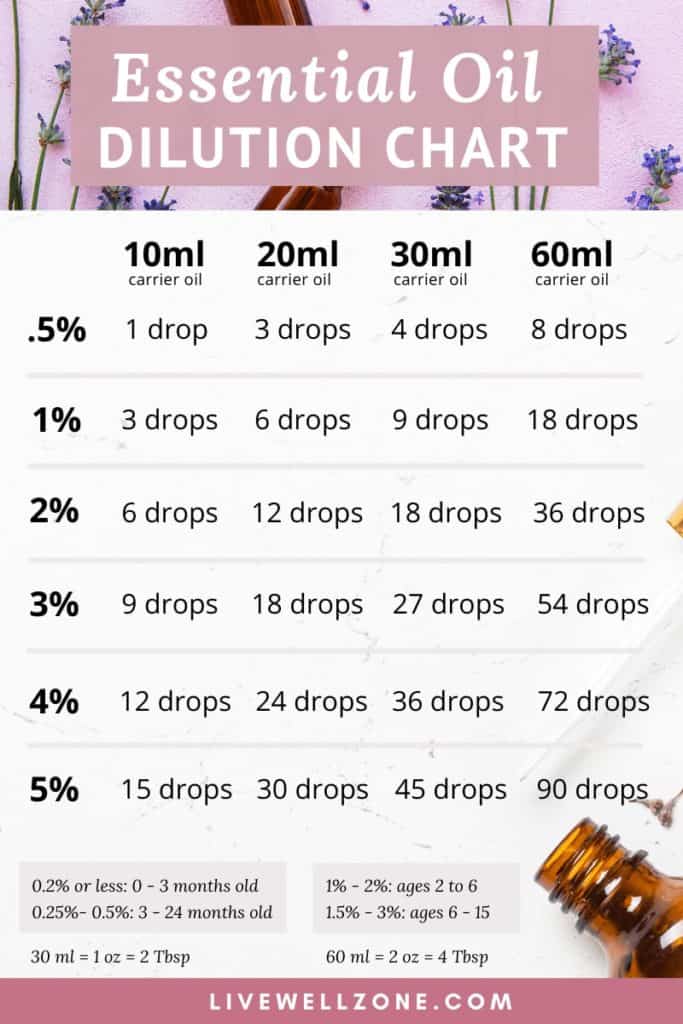
To figure out what you need for each dilution level, use the essential oil dilution ratio chart below (source).
Note: if you’re reading this on a mobile device, simply swipe left/right on the table to view all columns.
| 10ml | 15ml (½ oz) | 20ml | 30ml (1 oz) | 50ml | 60ml (2 oz) | |
| 0.5% | 1 drop | 2 drops | 3 drops | 4 drops | 7 drops | 8 drops |
| 1% | 3 drops | 4 drops | 6 drops | 9 drops | 15 drops | 18 drops |
| 2% | 6 drops | 9 drops | 12 drops | 18 drops | 30 drops | 36 drops |
| 3% | 9 drops | 13 drops | 18 drops | 27 drops | 45 drops | 54 drops |
| 4% | 12 drops | 18 drops | 24 drops | 36 drops | 60 drops | 72 drops |
| 5% | 15 drops | 22 drops | 30 drops | 45 drops | 75 drops | 90 drops |
| 8% | 24 drops | 36 drops | 48 drops | 72 drops | 120 drops | 144 drops |
| 10% | 30 drops | 44 drops | 60 drops | 90 drops | 150 drops | 180 drops |
| 20% | 60 drops | 88 drops | 120 drops | 180 drops | 300 drops | 360 drops |
10ml, 15ml and so on refer to the amount of carrier oil. These numbers also match up with the sizes of cosmetic bottles that are sold in stores and online (which are usually represented in ml).
With so many dilutions levels, how do you know what to use?
Here are some general guidelines:
- 1% or less: for pregnancy, small children and face.
- 2%: regular daily use
- 3 – 10%: for treating acute conditions or injury for a short period of time (about 2 weeks)
- 20%: for more severe conditions like burns, wounds or debilitating pain.
Throughout the rest of this article we’ll look at which dilution levels to use for specific situations.
In the meantime, here’s a visual summary of the essential oil dilution chart.
Feel free to save/pin this image for quick reference!
HOW TO DILUTE ESSENTIAL OILS FOR SKIN AND HAIR
When using essential oils on the skin a dilution rate of 0.5 to 5% is safest for regular, every day use.
Now, having said that, there are times when you might need a higher dilution.
For example, if you’re healing from a burn or fighting an infection.
Based on information from the Tisserand Institute, use the guidelines below to determine the dilution level that works for your needs.
| USE | DILUTION LEVEL |
| Face products | 0.2 – 1.5% |
| Whole body massage | 1.5 – 3% |
| Bath and body products | 1 – 4% |
| Specific problems | 4 – 10% |
| Pain and wounds | 5 – 20% |
Remember that with essential oils, less is more.
So, start with the lowest dilution for your needs. If you don’t get the desired results, you can steadily increase the dilution level.
Once you’ve figured out your intended use and the recommended dilution, you should also make sure that the oils you have are actually safe for the skin.
The table below shows the oils that are known to cause skin irritation and allergic reactions.
You don’t have to completely avoid topical use of these oils.
However, it’s important to follow the maximum dilutions listed below (source):
| OIL | TOPICAL MAXIMUM |
| Ajowan | 1.4% |
| Bay oil | 0.9% |
| Cassia | 0.05% |
| Clove Bud | 0.5% |
| Cinnamon bark | 0.1% |
| Cinnamon leaf | 0.6% |
| Garlic oil | 0.1% |
| Holy basil | 1% |
| Jasmine absolute | 0.7% |
| Lemongrass | 0.7% |
| Lemon myrtle | 0.7% |
| Lemon-scented tea tree | 0.8% |
| Massoia | 0.01% |
| May chang | 0.8% |
| Melissa | 0.9% |
| Opoponax | 0.6% |
| Oregano | 1.1% |
| Oakmoss absolute | 0.1% |
| Peru balsam | 0.4% |
| Summary savory | 1.4% |
| Thyme | 1.3% |
| Winter savory | 1.2% |
| Ylang ylang | 0.8% |
Essential Oil Dilution For The Face
As we saw in the essential oil dilution chart, a 0.2% to 1.5% dilution is recommended for face products.
This means that whether you’re making your own face oil, anti-aging serum or face mask, you should always go with a 0.2% to 1.5% dilution.
Some of the essential oils that are effective and gentle enough for the face are (1, 2):
- lavender oil
- frankincense oil
- juniper berry oil
- geranium oil
- tea tree oil
- myrrh oil
- rose oil
- sandalwood oil
- chamomile oil
- copaiba oil
- peppermint oil
Essential Oil Dilution For Hair
Essential oils can be mixed with shampoos, conditioners and other hair oils to:
- stimulate growth
- reduce hair loss
- fight dandruff
- treat dry hair
When you make an essential oil blend for hair, remember that your scalp is an extension of your skin.
And it’s also quite easy for anything that is applied onto the scalp to absorb into the brain.
So, when you dilute essential oils for hair, follow the same dilution guidelines as you would for your face (0.2 – 1.5% dilution).
Some oils that are great for hair growth and overall hair health include (source):
- rosemary oil
- peppermint oil
- tea tree oil
- sandalwood oil
- lavender oil
- geranium oil
- clary sage oil
- chamomile oil
- cedarwood oil
Essential Oil Dilution For Bath
The first thing to note about essential oil baths is that essential oils do not mix with water.
So, never add essential oil directly into your bath water.
Secondly, do not use milk, salts or baking soda as a carrier for essential oil in a bath.
This is because all three of the above substances dissolve in water and the essential oils will separate out from them (source).
Instead follow one of the following recommendations:
- Mix 5 – 20 drops of essential oils in 1 tablespoon of jojoba or fractionated coconut oil. This mixture won’t mix with the water. Instead, it will float above the bath water. It’s greasy, but protects your skin!
- Combine 5 – 20 drops of essential oil with 1 tablespoon liquid castile soap. Add the mixture to your bath water. No greasy mess to worry about in this case 🙂
HOW TO DILUTE ESSENTIAL OILS FOR BABIES, YOUNG CHILDREN AND TEENS

Compared to adults, young children (and babies, especially) have thinner skin that absorbs substances more easily.
Therefore, it’s important to follow the dilution and safety guidelines shown below (source).
| AGE | RECOMMENDED DILUTION |
| 0 – 3 months | 0.2% or less |
| 3 – 24 months | 0.25 – 0.5% |
| 2 – 6 years | 1 – 2% |
| 6 – 15 years | 1.5 – 3% |
In addition to the above guidelines, you can also consult with a licensed aromatherapist.
It gives you an additional layer of verification and comfort.
Last but not least, for a detailed list of essential oils that are safe for kids, this article from the Herbal Academy as well as this one from Mommypotamus are helpful resources.
HOW TO DILUTE ESSENTIAL OILS WITH ALOE VERA
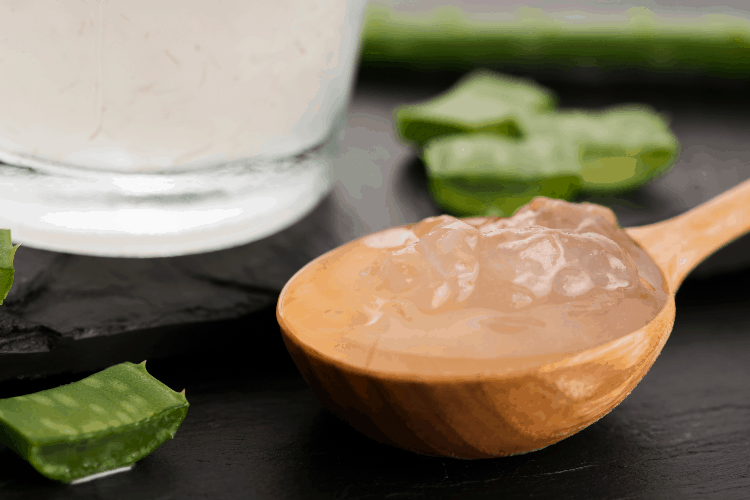
Aside from carrier oils, aloe vera is another carrier option for essential oils.
Just keep the following in mind when using aloe vera for essential oil dilution:
- since fresh aloe gel from the plant is mostly water, it’s not ideal for essential oil dispersion. So instead, use an aloe jelly product that has been blended with a thickening agent. That thickening agent helps to better disperse the oil.
- use the same dilution guidelines as you would for carrier oils.
- since aloe has a sticky consistency, it’s best for spot treatments.
- avoid using aloe vera gel on serious burns or heavily infected wounds because it traps heat, which can worsen the problem.
RELATED QUESTIONS
Can baby oil be a carrier oil for essential oils?
Baby oil is not a good carrier for essential oils because it contains mineral oil which creates a barrier on the skin. This barrier prevents the skin from properly absorbing essential oils.
How do you dilute essential oils to make sprays?
To make a face spray, blend 7 drops essential oil with 1 ounce of water and a dispersing agent (such as solubol). The dispersing agent allows you to emulsify water and oil together.
CONCLUSION
Even though there are some essential oils that you can use without dilution, knowing how to dilute essential oils will actually give you better results.
I hope this guide was helpful and that you now feel confident to move ahead with some essential remedies of your own.
If you have any questions or feedback about anything in this post, drop a comment below! 🙂
Related Posts:
4 Powerful Essential Oils For Pain and Inflammation
How Much Is An Essential Oil Starter Kit? Average Cost with Example Prices (for 2021)
6 Scientifically Proven Essential Oil Blends For Menstrual Cramps
18 Essential Oils For Sore Throat: How to Use and Easy Recipes
Top 10 Essential Oils for Nausea That Are Proven To Work Fast


WOW! Fantastic amount of useful tips and knowledge, that so much for sharing.
Glad it’s helpful!